Tomorrow I think I get to make velvet bias binding. #sewing
So far today, I've finished stitching the channels to fill with crushed walnut shells, and I've removed the thread-marking. I'm still trying to figure out how to make velvet bias binding. I can procrastinate this for ages though. Watch me.
I need 280cm of 6cm wide binding, which is 1680cm², so I need a bit of velvet about 40x50cm to cut strips from. This is my first go. I've started by cutting along the diagonal centre of the rectangle and I'm going to take all my other lines from that.
I've made almost 3m of velvet bias binding by finger-pressing it and rolling it around a drink can. I'm hoping that this will keep it in shape long enough to apply it, because I'm afraid to iron it.

I also filled my vest channels with crushed walnut shells. The pattern said 2¼ litres of rice and that was about the amount of powder it took to make the channels fairly nicely filled. I'm looking at it now in case I decide to increase or remove any. Once the binding is applied, that's final.

I'm a little concerned because the back is definitely heavier than the front.
Ok, I checked my bobbin, swept all the fluff out of the machine, and started #sewing the first side of the binding. I used a zipper foot to get right up close to the stuffed parts.


I had to stop before I'd finished because it's incredibly fiddly to manage the WEIGHT of all the crushed walnut shells in the stuffed channels, and the BULK of them doesn't help either. If I ever do another one, I'll apply the binding to almost all of it before I stuff ANY of it. Live and learn.
Ok one side of the binding is on but I need daylight to hand sew the other side so it will have to wait until tomorrow.

I'm handsewing the binding today but between needing daylight and my ridiculous hands, I got only about a tenth of it done. This was partially because figuring out what I'm doing is slow, so tomorrow will be a bit better. #sewing
I think I'm about a third of the way through handsewing the binding. It's not very exciting but I'm probably getting better as I go along.
I've almost finished the handsewing but I have to stop. Tomorrow will definitely be the last day of sewing this thing though, and then I can hoover it and give it to its actual owner. I'm not sure whether it's a heat pack or, like, a weighted blanket, though.
This is when I started this project. For me, this is quick work.
https://mastodon.art/@artbyailbhe/109587452443901441
https://mastodon.art/@artbyailbhe/109587452443901441

Ailbhe (@[email protected])
I wanted to do #sewing but it turns out that first I need to do #ironing. I've ironed the paper pattern and cut out the bits I need and folded the rest back into the packet, and I've read the instructions and figured out what fabric I need, and next I need to iron the blasted fabric. This is ridiculous. I don't want an ironing hobby.
Finished! One microwave heat pad for neck and shoulders, cotton velvet outer, filled with crushed walnut shells. I'm not delighted with the corners on the bias binding and if I make another I'll just curve those. I'm too tired for alt text but will try to fix later.


The heat pad was a Simplicity pattern and I'm hoping that my next project will be an Ellie And Mac Slow Sunday t-shirt. I'm figuring out sizing by using Marks and Spencers to turn a UK dress size into bust inches and the Ellie And Mac chart to turn inches into a size. It will either work or not but at least with M&S it shouldn't come out much too small.
Stage 1: print pattern
I did this when I bought the pattern, I sent the file to a printer and got it all on A0.
Stage 2: print instructions
That's 72 pages? What? I'm printing pages 12-25 and hoping that's adequate. I'm pretty sure it would be cheaper to get it done by a professional if you were going to print the whole file, first the instructions and then the whole pattern divided into A4 pages.
✅ Ironed tissue paper salvaged from shoe and lingerie packaging
✅ Traced first part of pattern from A0 printout onto tissue paper taped together
Ooh, tracing drew to my attention some fairly subtle shaping on the back. Cool.
I'm definitely too tired to tackle fabric cutting today. I might put some hanging loops on hand towels instead.
No, I do not know what's good for me and I did the cutting. Tsk. I could not make the sleeve caps match without wasting yards of fabric but I think I did make them balance.

I've looked through the instructions I printed out and what I actually need, from the 72 pages, are 11, 12, 21, 22, 23, 26. I've stapled the extra instructions for the variations together in discrete sections to make it easier when I go back and do other things but six pages with two steps per page is a lot less daunting than the tome I started out with.
Since it's too late to sew and I'm too tired, I'm trying to decide if I can make this top (designed for stretch fabric) from plain woven if I cut it on the bias.
I've been sewing this today but forgot pictures and now I'm too tired. This was from before I started; my thread collection only has greens which almost match so I chose pink. And then I pinned things in the easiest way for *inserting* the pins, which was the most ridiculous way for *removing the pins while sewing*.
Later I must iron and topstitch hems.


Pressed, hemmed, topstitched. It's cooling down now before I fold it up for transport to the recipient. #sewing


For my next trick, I will take the remains of some jeans, and make a bucket hat. I've made versions of this free pattern from https://www.applegreencottage.com/tutorial-cute-bucket-hat/ before so it's just that I hated #sewing during the heatwave last year and I'm hoping to get the hot weather things -- like hats and cooling scarves https://mendingbloc.carrd.co/#coolingscarves -- finished while there's ice on the ground.


I sewed a really tricky bit with no thread on my bobbin and didn't notice because I was paying close attention to pulling out all the pins before I reached them. #sewing
Oh DAGNABBIT I sewed the lining to the exterior and instead of leaving a gap to turn it right side out, I sewed DOUBLE around that bit because I was admiring the curves. #sewing

Burnt my fingers while ironing. I'm clearly not up to the job.
Today I'm hoping to cut the pieces for several hats, so that I can assemble them gradually between other things.
I finished the hat made out of ¼ of the legs of some jeans. The pattern is for a reversible hat but I think denim would be incredibly uncomfortable inside so this photo is just to show you the lining. And the final picture is the place where the fabric is most obviously re-used jeans . #sewing #recycling


Also today I mended a pair of homemade underpants. I originally used cotton jersey to cover the waistband elastic and the cotton gets worn through on the fold by the elastic because cotton is softer than whatever petrol products elastic is made of. I'm just going over it by hand with whipstitch and rejecting covering the elastic as a technique in future. #sewing #mending
All the #sewing I managed today was handstitching some torn places on an ancient silk shirt that didn't enjoy the washing machine. But it's nice to be able to handstitch things. A combination of chronic fatigue easing up and physiotherapy helping me get stronger.
Today I reduced this heatpack thing to a kilo weight. I think it will still be warm.

Ailbhe (@[email protected])
Attached: 4 images Finished! One microwave heat pad for neck and shoulders, cotton velvet outer, filled with crushed walnut shells. I'm not delighted with the corners on the bias binding and if I make another I'll just curve those. I'm too tired for alt text but will try to fix later.
I'm so not sewing these days. Today I just about mended a pair of knickers to wear tomorrow. My right thumb has been wrapped in sticking plaster for over a week and fabric things are really tough without it.
Tidied the sewing table a bit though so tomorrow I can do more.
Between 25 and 22 months ago I made myself eight pairs of pants and now they're all fraying at the waistband. I'm going to make myself some new ones while I continue to mend the old, so that they don't all fail at once.
Because starting the project I intended is too boring, I am instead starting a tank top with built in bra. This photo is me carefully tracing *completely the wrong size* from the multi-size pattern I got printed on A0 paper. #sewing

Luckily the built-in bra needs elastic that's *exactly the size* of some waistband elastic I salvaged from jersey boxers a couple of years ago. It's even already in a loop. #recycling
I've done a lot of fiddly laying out of pattern pieces and I think the collar and armscye bands will have to be in a contrast fabric.
I managed to find enough fabric in the end, and I'm pinning my fingers to the collar and cuffs.
It's all done except the finishing -- fauxverlocking, top-stitching, hemming, trimming threads. I've obscured the model's grin of delight. Thanks to @RealKaren for recommending Ellie And Mac "Slow Sunday" pattern. https://www.ellieandmac.com/products/slow-sunday-top-dress-pattern #sewing

I'm going to try to use elements of the pattern to make a sleeved t-shirt with a built in bra. I think joining the neckline will be easy but matching and binding the armscyes is both tricky and a necessary part of making the bra supportive.
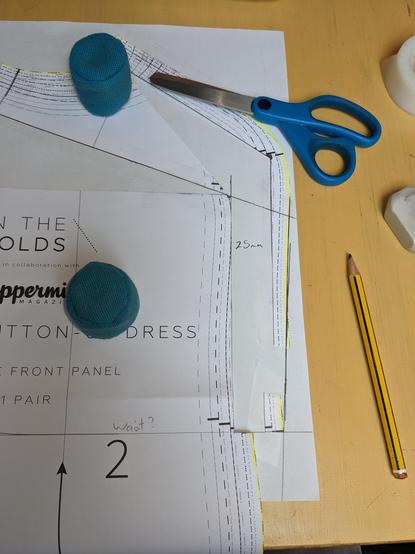
First I'm looking at a pattern for a button front dress with princess seams for which I need to do adjustments for a fuller bust as it's not a stretch fabric pattern. I'm sure it'll be fine.
I've printed the pattern, highlighted the size I need to cut, definitely cut the correct size, and now I need to figure out how to do a full bust adjustment on princess seams. #sewing
Searching for YouTube videos on Full Bust Adjustment is to be done very carefully, kids.
This YouTuber has at least two videos on how to do a full bust adjustment on a princess seam and I find them easy to follow. I think I understand how to do this tomorrow. https://youtu.be/pdLLEIb0SDk
#sewing
#sewing

How To do a FBA on a Princess Seam
Here's my pattern pieces. I'm about to watch the video again with my pencils and scissors.
Partway through a full bust adjustment. I'm increasing twice as much as the tutorial. It'll either work or not. #sewing

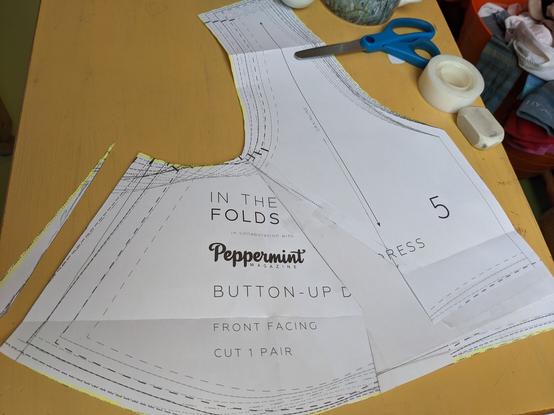
Ok I've done the full bust adjustment to the centre front and side front panels with princess seams but now I'm looking at the front facing pieces and I realise this is totally different but still needs to be adjusted. They're allegedly flat facings.
Ok.
Ok.
I just used the bust apex measured from armscye on the centre front, and the inserts from the front side, and I think this might work. You can see where I added bits and where I took a bit away. #sewing
But apart from the full bust adjustment, and a length adjustment, and adding sleeves, and probably changing the placket, I'm definitely following the pattern.
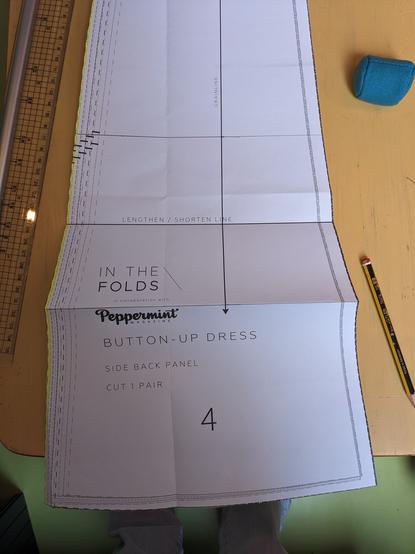
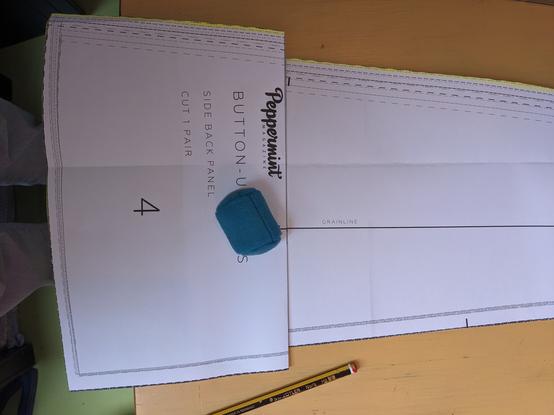
Ok I need to shorten this six inches. Which is almost funny. But I've shortened the centre front, side front, side back, and centre back, and checked the notches and hems of each piece against the piece it will be sewn to. #sewing
Test run in gingham, which is graph paper for dresses.
I needed to have bought two yards of fabric but I have a lot of useful bits left over. I wonder if I can insert pockets usefully. The side seams are almost the last bit to add so I probably can.
I'm not sure how best to tell which side of my gingham fabric is the right side. Next time I'll pick one before I fold to cut and scrawl across it in Frixion pen.
Expanding the bust two inches, one on each princess seam, is about the limit this pattern can take I think. It would need to be done differently for larger adjustments. The curves are formidable as it is. #sewing
And one of my notches on the adjusted pattern is in the wrong place. Not a crucial one though.
Today has been mostly ironing. "Finish the seams using your preferred method," says the instructions, and I'm pretty sure they mean overlock/serger. But it turns out what I require from a finished seam is raw edges enclosed and no loose tickly bits, so for probably the first time in my life I'm cutting half the seam allowance off one side and doing horribly fiddly ironing. I really must get a tailor's ham. I made one for facemasks but this bust seam needs something rather more serious. #sewing
I think next time I'll just do French seams. They're easier.
Iron a seam, sew a seam. Iron a seam, sew a seam. Iron a...
I got confused about applying the facings and searched for videos of people making the same dress. This is the one that helped: https://youtu.be/CGBJw19A6Ls

Button Up Dress SAL - Día 4
@artbyailbhe that looks excellent - funnily enough I’m currently wearing a nightie using the same pattern
@RealKaren I need to adapt for fuller bust issues before I can make one with a higher neckline, I think, but soon I expect Eldest will have an extensive wardrobe of this pattern's permutations! I'm wondering about adding sleeves to the racerback option; the bra uses the racerback shape.