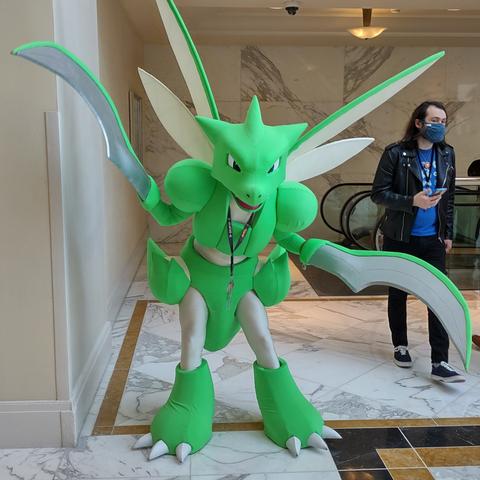
This #fursuitfriday I want to start a thread on how it's made.
Over the coming days I'll drip-feed the process of building my Scyther suit. Feel free to ask questions as we go!
This #fursuitfriday I want to start a thread on how it's made.
Over the coming days I'll drip-feed the process of building my Scyther suit. Feel free to ask questions as we go!
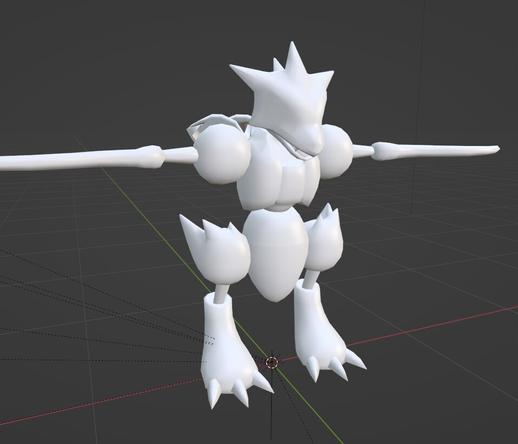
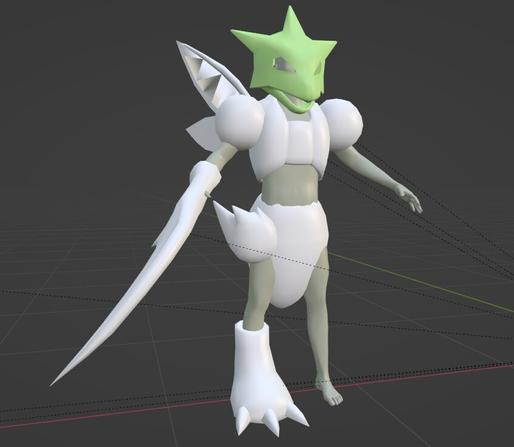
The process starts with 3D modeling. Since my goal is to make the costume as game-accurate as possible, I start with a ripped model (in this case from XY).
Then I created a 3D approximation of my human self with a program called "MakeHuman". I start cutting up the model and positioning, scaling, and morphing the pieces to best fit me.
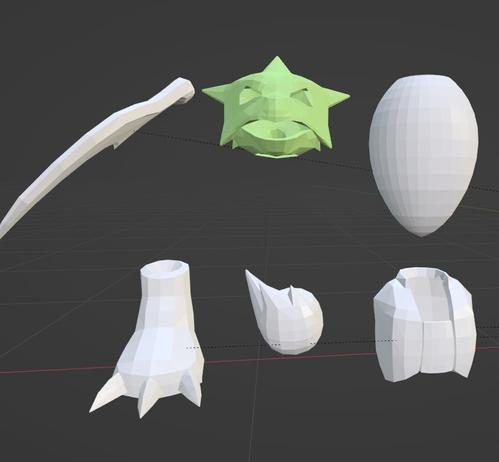
Finally I gather the pieces and perform decimation and other forms of cleanup to prepare them for generating patterns.
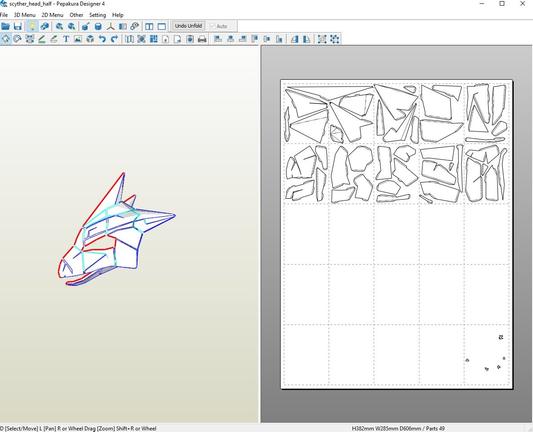
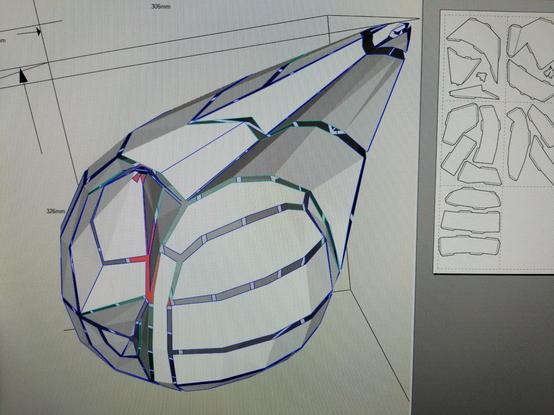
Following on, I bring the model pieces into the program "Pepakura Studio" which is software to make papercrafts. I went through the trouble to cut up and organize all the pieces to print cleanly on printer paper for assembly.
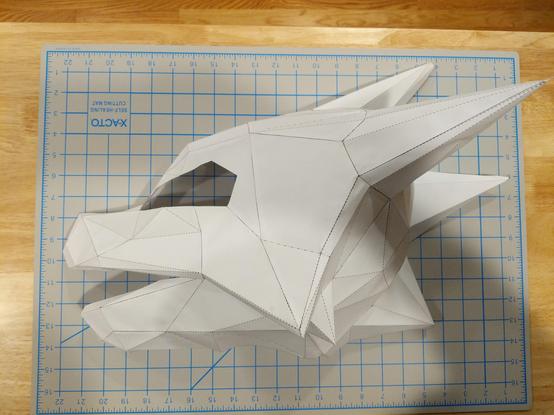
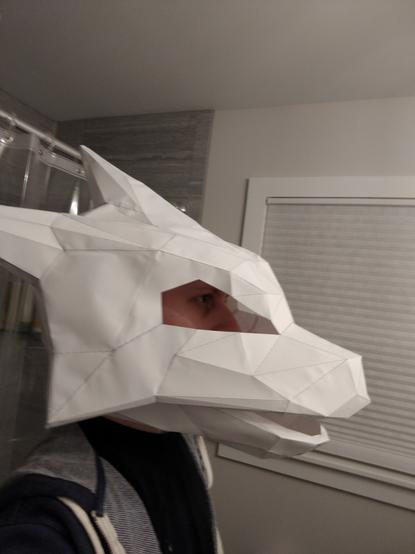
Actually assembling the papercraft means I can verify the scale before moving onto real materials.
And assembling the full papercraft meant I could even try it on first (remembering to account for foam thickness).
For the head, I made 1.5 copies so I could have one reference, and one that I would cut up and copy to cleaned up patterns. Then I'd cut the foam from them.
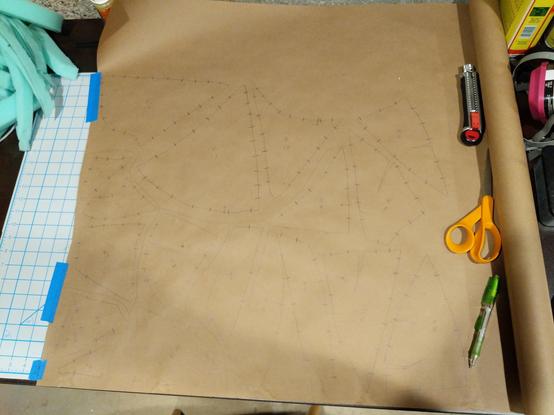
Here's a couple more examples of the papercraft parts and a drafted pattern. Packing kraft paper, for the record, is an awful material that will curl back up on you like mad.
If you have more confidence in your patterns, you could make bigger pieces in Pepakura and tape them together. They often don't need to be completely perfect.
And once you move onto the foam, trust your pattern. When you're first cutting and gluing parts together, it may feel unintuitive that it's going to work.

Scyther's head was made from EVA foam, cut out from that floor mat in the background and glued together with Barge contact cement.
It's a single hollow shell, spikes and all, and plenty roomy on the inside. The EVA is quite rigid compared to soft foam, but still has some give for pulling it on and off and has no danger of cracking. I really liked the material for this application.
It's also a fantastic medium for wrapping with fabric, which we'll get to later.
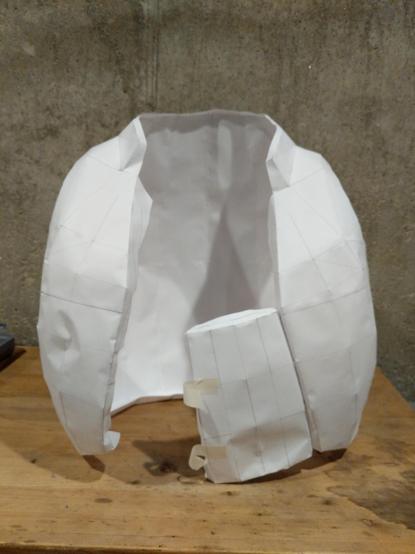
Building out the chest followed a similar pattern. The main shell is rigid EVA, but to allow more flex in the shoulders, those are built from softer upholstery foam.
I didn't bother to papercraft the shoulders, I took a measurement from my model and used an online calculator to help create a 1/8" sphere wedge template.
This actually represents the V1 of the chest, I ended up building a second version between its debut at MAGFest and competing at Connecticon.
The abdomen was one of the few places I didn't pepakura pattern. Like the shoulders, I drafted out an appropriate wedge pattern to fit the shape (I got my diameter measurements from vertex pairs in Blender).
Ultimately I ended up with a big foam egg, and then it was a bit of guesswork to trim it to the correct size and cut out the leg holes. I'm using the softer foam because flexibility is important in this part.
The hip joints I showed the patterns for earlier, and those got formed out of EVA and glued in place.
There's a magnet strip on the back and a corresponding magnet belt, which secures the abdomen primarily in the back. This is an idea I borrowed from SpiritPanda's Scyther build.
The feet follow the same pattern. You don't always need to assemble the papercrafts, but they help when you don't have absolute confidence in what you're doing. They're also an opportunity to draw the best cut lines, as marked here.
I'm still amazed how everything can be assembled, but until that last seam goes together, the difference is between "warped sheet" and "definitely a foot".
Scyther should have a more exaggerated digi foot, but I modified the model to contain my foot and show a little bump out in the back.
I accidentally created a challenge for myself when my marker outlines ended up on the outside of the assembled piece. These marks would be visible through the spandex cover. And the marker will bleed through most materials that try to cover them up. What works? White-out!
The foam uppers got glued to an EVA foam base, and there's thin shoe rubber covering the sole, making them suitable for outdoor use. It also makes them pretty heavy! Claws are being test-fit here.
Not visible in the previous photos are the slip-on shoes glued inside. Unfortunately for me I didn't do a great job adhering those the first time, and they both failed on my at MAGFest 2020. Here's the foot carefully torn back apart.
Second time around I used more layers of cement and added extra glue and anchors all around. So far that's holding up, and hopefully it'll stay that way.
Yeah, I even assembled a half papercraft for the scythe. Maybe a little overkill since I'm just tracing, but it helped ensure accuracy.
My first attempt was to sandwich two layers of foam together with a pocket at the arm end to slip my hand into. The result was a very sad floppy noodle scythe.
Second try. A new pair of foam scythe halves. Since I used a foam floor mat but needed smooth surfaces to bond together, I had to sand down the metal grate texture. That sucked a lot, so much dust. I buy smooth sheets now.
To get strength, I needed to reinforce the scythes. I burned out a channel in each one and sandwiched a couple of carbon fiber rods between them. The main rod extends back to my wrist. Carbon fiber is lightweight and very stiff.
I also tried embedding a handle inside that I could grab, but in practice it's hard to hook my fingers around and unnecessary.
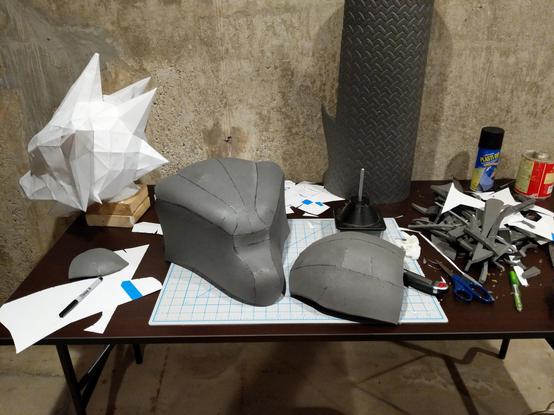
A really nice benchmark: test fitting all of the raw foam pieces.
I debated a few options for skinning Scyther, but ultimately settled on milliskin spandex. The high amount of stretch ended up being incredibly useful for clean seam control over the project.
I was also able to get spandex in a close enough color to what I wanted. But not close enough, so I dyed/tinted it! Nylon-based spandex can be dyed with standard RIT dye. Warm water and vinegar helps it along.
I wanted to give the green a more yellow tint. It's a subtle change, but I think it helped. I swear that's not a bucket of piss.
The first part I skinned with the foot, since it looked like the easiest place to practice. And I was pretty happy with the result.
I also completely forgot how clean his claws used to be. The claws are sprayed in white plasti-dip which works pretty well, but has gotten beat up over time from tripping over my own claws.
I did not create any formal patterns for cutting my fabric. Instead I used a technique called draping, where I just took a bunch of fabric and laid it over the piece. Or in this case, stretched it over the piece, pinning it in place in places where I thought a seam should go.
I'd do this multiple times until the piece was covered in pinned fabric, before sewing anything. Once placement looks good, a lot of pins (or clips) are used to hold the pieces together for sewing.
Symmetrical parts are helpful because I can pin them inside-out on the form and transfer directly to machine.
Previously I showed off a part with a million wonder clips holding the fabric together. These clips are great, but I didn't discover them until I came back to the project to do some V2 pieces.
Since the spandex is very slippery, single pins weren't really enough to secure it. I ended up doing a cross with the pins for a more secure hold. It worked, but it was a pain.
For the abdomen, the seam controlled afforded by spandex came it real handy. While Scyther does not have a fully segmented abdomen, the effect looks good and is probably better than any alternatives.
These hip balls on the other hand were an exercise in just finding something that kind of worked, and constantly stretching and repositioning fabric.
I added some additional anchor points inside (in the form of foam squares) since these would be bonded to spandex, which isn't going to be super secure. More surface area helps.
Finished piece was not fully symmetrical which irked me to no end, but I'm sure no one notices (but now you all notice!)
Something to be mindful of working with spandex, it will reveal every tiny sin in your underlying base. So the first step was to do a cleanup pass, smoothing edges, filling seams, getting any tapers I wanted.
I also sprayed all of the EVA foam with white plasti-dip. This helps smooth things out a little bit, but more importantly it more closely matches the green foam. The darkness of the EVA actually would show through the spandex.
This is also where I took a major misstep. In many fursuit WIP photos, you'll see a masking tape pattern applied to the base, which will be used to make the fabric patterns.
Even though I draped up to this point, I thought the patterns might be helpful. Unfortuately, masking tape sticks to plasti-dip REALLY well. Not only did I destroy the pattern pulling it off, I also tore out chunks of foam. I had to do my best patching this up with white silicone.
Here's the head slowly coming together!
The tongue is cheap craft felt glued in place. There's black tulle glued in the upper portion of the mouth to help hide my face if someone looks through. I get pretty good vision through there.
The eyes are flat pieces of painted buckram mesh glued to the inside surface of the head. Plastic sheeting is cut out for the whites.
All he's missing is his little nostril marks, which I remembered to do at the very last moment.
I don't have many WIP pictures of the scythes finishing process. I don't remember if I plasti-dipped any of it.
Finishing the foam involved cutting in the edge of the blade, and carving in the center line.
The top was formed with 2mm EVA foam, and the cuff was formed from the softer green foam. All wrapped in spandex and sewn and glued in place.
Silver paint finished them out.
Time to finally get to wings! I started with a round of prototyping materials (the intention in each case was to wrap with fabric). The foam was an immediate no-go, and I settled on a steel wire frame.
I had two requirements for the design: I should be able to mount them horizontally or vertically (pointing down), and they should be able to swing back if someone hits them.
I sketched out a design using cabinet hinges and a cross bolt pattern.
The engineers should note how bad my "wing truss" design is, plus the very weak solder joints. You'll be happy to know these did not hold up.
The outer edge of the frame was wrapped in 2mm foam, which allowed the spandex to "float" above the frame, making it less visible.
To support the weight and leverage of the wings, a steel plate was mounted inside the body piece with some threaded inserts. This distributes the force across most of the back, which is sufficient to hold up the wings.
And here's a test mount before I flipped the fabric inside out and finished them. I actually never cleanly finished the base of these. After MAGFest 2019, I got to work on a complete replacement of the wings and chest, which will be the next topic...
Alright, MAG 2019 was fun, but I wasn't fully happy with the chest piece and one of the wings was sad and broken by the end of the weekend.
The hinge concept was durable, but didn't work great in practice. Keeping the wings partially extended out involved a crude hack of shoving dowels in the hinge and holding them in place with rubber bands. They were hard to mount and required a screwdriver.
I started prototyping ideas and realized a spline could give me multiple locking positions. And an L-connector could give me rotation on two axes. I also just got a 3D printer...
The new wings would have a 3D-printed base where the steel wire could securely mount in places, and it would slide onto a spline post to mount. An embedded magnet inside would help secure it if the post was angled sideways, as it would be when the wings are kept in the downward
"safety" position.
As a bonus, the green filament I found was almost a perfect match for the fabric I was using.
The new wing frames were built more like a truss to eliminate flex at the joints.
The joints themselves I went a bit overkill on to make sure they wouldn't fail. I also had to move up to a propane torch to properly solder these.
Here's the wing uppers mounted in their bases.
For extra support, a carbon fiber rod was run along the spine of each wing, held in place by wrapped thin wire.
The perimeter of each wing was wrapped in foam, like before, to help float the fabric over the frame.
Wrapping the wing in fabric, and a comparison to the original wing. The shape is different and I think more accurate to the game model.