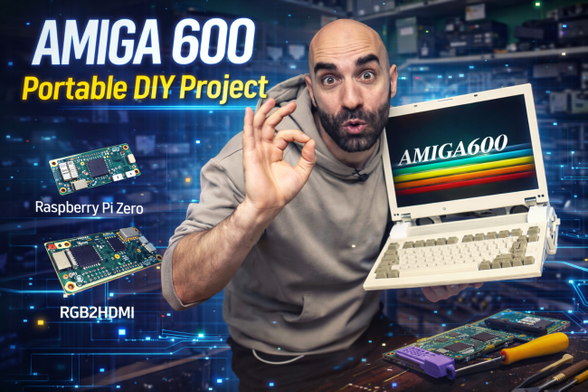
Amigas Portables: El A600 de GiuSimoo89 con pantalla abatible.

Seguimos disfrutando de la inagotable creatividad de la escena, y esta vez el protagonista es el canal GiuSimoo89, cuyo autor detalla con todo lujo de detalles el complejo proceso técnico para transformar un Amiga 600 clásico en un dispositivo portátil plenamente funcional. No se trata solo de encajar piezas, sino de un ejercicio de ingeniería y respeto por el hardware original.

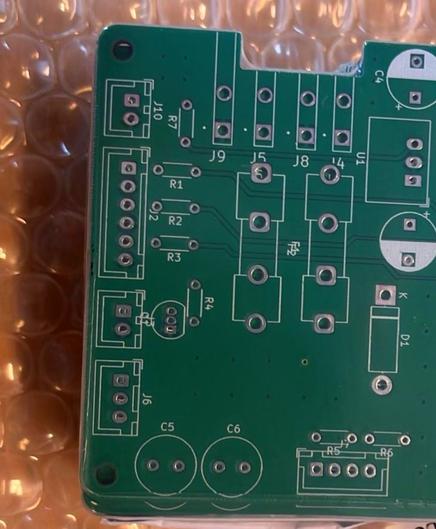
El proyecto destaca por la integración de una pantalla de portátil recuperada, gestionada mediante un módulo RGB2HDMI junto a una Raspberry Pi Zero, logrando así una señal de vídeo digital limpia y estable. Para garantizar esa estabilidad, el creador diseña y suelda PCBs personalizados, además de fabricar soportes específicos mediante impresión 3D, cuidando que todo encaje sin romper la estética icónica de la carcasa original del A600.

La modificación se completa con mejoras muy interesantes: sistema de audio amplificado, doble arranque de ROM y la posibilidad de conectar fuentes de vídeo externas, lo que multiplica la versatilidad del conjunto. Seguimos conociendo nuevas formas, de distintos usuarios, para hacer portables nuestros Amiga. Anteriormente ya publicamos los interesantes proyectos de Ms Mad Lemon y Slince, que integraban fuentes de alimentación internas, entre otras proezas. Quizás,  este sea el sueño húmedo que muchos tuvimos en tiempos pasados (y no tan pasados).

https://youtu.be/7p_8M7A-lDI?si=nNu7NsaPfaNKAEH5

#3DPrinting #amiga600 #AmigaModding #AmigaPortátil #AmigaScene #amplifiedAudio #audioAmplificado #classicHardware #customPCB #DIYProjects #dobleROM #dualROM #electrónicaRetro #escenaAmiga #hardwareClásico #impresión3D #moddingAmiga #ordenadorRetro #PCBPersonalizado #portableAmiga #proyectosDIY #RaspberryPiZero #retroComputer #retroComputing #retroElectronics #retrocomputación #rgb2hdmi
Using 3D Printing And Copper Tape To Make PCBs

In a recent video [QWZ Labs] demonstrates an interesting technique to use 3D printing to make creating custom PCBs rather straightforward even if all you have is a 3D printer and a roll of copper t…

Hackaday

More custom PCBs for the pager system arrived! These header PCB for Pi are for our additional new transmitters so we'll be able to cover all of #39c3.

Designed by one of our engineers.

#DIYPager #transmitter #PCB #CustomPCB #PrintedCircuitBoard #ChaosPager #POCSAG

🎥 New video is live!
Here’s what’s inside:
💡 Custom LED Matrix launch
🖨️ Fresh 3D prints (including a tiny mouse!)
🎮 Retro gaming nostalgia
🎶 Projects + updates from the team

Check it out and let us know what you think 👇
👉 https://youtu.be/gazVCKzA7XA

#electronics #3dprinting #retrogaming #raspberrypi #custompcb

About that BusBoard Prototype Systems SB4 board -- they're expensive. They're more than $6 each (Canadian) plus shipping from DigiKey. They're $10 each plus shipping from Mouser.

That's a lot for a hobbyist when you're experimenting, especially if you're making mistakes.

I looked around again recently, and couldn't find anything I liked at a reasonable price point.

So what does one do in this situation? Well, if you go Overkill 9000, you design your own prototyping perfboard and have a bunch manufactured for you! When you design your own, you can give it any features you like. So this one has:

18 x 36 (648 holes total)

It's two 18 x 18 sections, though I didn't have them scored for snapping.

A total of 6 horizontal busses in groups of 2, at the top and bottom plus one in the middle.

3 sets of 2 vertical busses within that space between horizontal bus sets, similarly edge - center - edge.

Then each row has a 6-hole pad on each side of the center 2 busses, which are spaced for IC or other standard 0.4" component layout.

Made of proper FR4 fiberglass. Good copper, good soldermask.

Silkscreened row and column IDs on both the front and back, at both the start and end of each row/column (and they match up with the back...).

And silkscreened boxes on the front showing the pad/buss pattern - no more flipping!

They arrived today and ... they're beautiful.

2/x

#PCB #CustomPCB #silkscreen #overkill #Overkill9000 #buss #busses #pads #components #IC #DIP

Microsoft Sculpt Keyboard Lives Again With RP2040

Hackaday readers are likely the kind of folks that have a favorite keyboard, so you can probably imagine how devastating it would be to find out that the board you’ve sworn by for years is go…

Hackaday

Soldered a mic preamp for dynamic mic in a old cable tv amp.

Nice shielded enclosure with efficient integrated isolated switching power supply.

Changed the voltage divider at TL431 regulator to get 2 volts more, and made floating ground for OPV electronics at half voltage.

OPV is a LM833 with lower noise than my old one.

This time i was to lazy to make a custom PCB.

#soldering #customPCB #diy #electronics

Festive PCB Gives The Gift Of Hacking

‘Tis the season for gift giving, and what better to give than a newfound love for hacking, soldering, and blinkenlights? In order to spread cheer and education at the local hackerspace, [Tom …

Hackaday

Added some capacitors and resistors to make sure eveything is stable. The PCB is not as tidy any more, but it's satisfying to do things right.

#electronics #pcb #pcbdesign #custompcb #attiny #hobby #hobbyproject #tinkering

Drew up this little PCB for a potential ATtiny high voltage programmer. Pretty neat if I may say so myself 🙂

#electronics #pcb #pcbdesign #custompcb #attiny #attiny85