I suffer the great grape disaster and the chickens get a foot spa
Cruella (my wife) is still away at our English house over mothering our idiot son. I meanwhile am gardening all day till I pass out with the heat. When I come round I drag myself under a bush and rest for an hour or so and then get back at it till I gets dark; I am thinking of buying a head torch!
Anyway the real problem is that I have suffered a terrible attack of brown spot on my grape vines and I have only one bunch of grapes. When I phoned up sobbing to tell Cruella (my wife) about the grapes, all she said was “are my girls too hot in this heat”. I am thinking of consulting divorce lawyers, but I’m afraid she would find out. On with the gardening.
27th June 2026. Things I have been doing lately in the garden
- Dealing with brown spot on grapes
- Lightly trimming hedges
- Pruning back a fig for netting
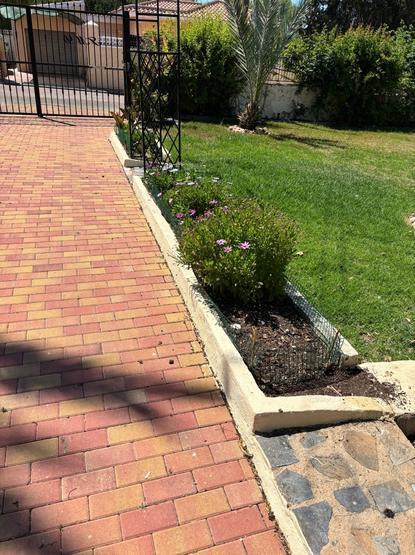
- Some rockery planting
- Mulching my lawn
- The chicken foot spa
Dealing with brown spot on grapes. It has been a wonderful year for grape vine growth. The heavy spring rains have ensured that grape foliage growth has been profuse. The photos below show the heavy early growth.
This lovely spring foliage has been my downfall. At first glance all looks well and this meant I concentrated on other areas of the garden. Normally I would check the vines and begin to dress them (cut back excess foliage to expose the grape bunches to air and light). But because they looked so well I left them too long.
The lush foliage meant a lack of penetration by air and light leading to ideal conditions for all sorts of mildew and pathogens to get a grip. By the time I began to look at the vines it was too late. Brown Spot had attacked the vines harming leaf development and inhibiting fruit production. These two vines gave us 20 or more big bunches of grapes last year, but this time just one!
The photos below show the extent of the devastation on the leaves. The discolouration and the spotting on the stems shows the pathogen at work. The only solution is to cut the vine back, let in air and light and take off all the affected leaves and destroy them.
Notice the spots on the leaves Just one bunchThe photo below shows all I have left, a single bunch of bagged up grapes. Sometimes I don’t know why I bother.
Lightly trimming hedges. By now all your hedges will be growing like “Topsy” falling and cascading over paths and lawns.so now is the time to give them a light trim. I am not talking about the big winter cutback type of trim, nor am I recommending that you destroy poor little late nesting birds. Instead, just feather the edges of your hedges to keep them in shape and to stop them overshadowing lawns, paths and flower beds.
The photos below show some of my hedges before and after their trim. Remember, if in doubt take off less.
Pruning back a fig for netting. Most fig trees in Spanish gardens are huge behemoths with unreachable fruit that eventually end the year in a messy sticky bird feast. Now if you don’t mind the birds getting your figs, then just skip this section. However, if you like figs – and I do – then you need to net your tree.
You won’t need to net it yet, do it just before the figs get ripe. The trouble is if your tree is too big, then you will need a Cherry Picker to get up there with your net. Instead, I recommend you carefully prune back excess growth and bring the tree within manageable netting potential.
The photos below show one of my fig trees with just this years growth which is enormous thanks to those early spring rains.
Beware the deadly sap and make sure you cover upTo bring this back into netting range is a two day pruning strategy. Cutting fig branches is a dangerous practice this time of year as when you cut the branch it quickly oozes corrosive sap that will badly burn your skin. Don’t rush out there and hack at your fig. Instead wear trousers and a long sleeved top, use eye protection and where possible use long handled lopers.
Day one cut back the bottom branches of the tree making sure you work upwards from the bottom so no sap is dropping on you. The photos below shows day one. Do not touch the fallen branches leave them to fully dry in the sun overnight.
Day two is the same process but this time you are working on the top of the tree. Again, make sure you work from the lower branches to the top. It is important that you do not attempt to touch or pick up the fallen branches leave them again for another full day. Once the cuttings are fully dry -day 3- you can safely gather them up and compost them. The photos below show the end of day 2 with the tree cut back and the big clean up starting.
Some rockery planting. Some year back I created a water feature using large rocks which I then in turn tried to plant into. My planting was obviously a failure as the soil would just fall through the rocks leaving the plants stranded without soil. To overcome this I instead tried to conceal plants in pots between the rocks, but this just looked silly.
However, the other day whilst rooting around in my shed I had a brainwave that will revolutionise rockery planting. I found some old shade netting which will soon become the future of rockeries – patent pending. The photos below shows the new wonder material.
My new wonder materialMy big idea is this, by cutting this into set lengths I could push it into spaces I had created in between rocks, thereby creating pockets which I could then fill with soil and plant into. I could then trim the material tight to the space and the plants would eventually grow over to give a completely naturalistic rockery -ta dah!
I telephoned Cruella (my wife) to inform her of my invention and how it would make me a fortune; she just called me pathetic and slammed the phone down. Well we will see who has the last laugh – I am thinking of calling my yacht “Cruella’s Folly”. The photos below show the development of the rockery revolution.
Once I had cut off the excess material it looked like the plants were just growing out of the rock
Mulching my lawn. I know not many of you have lawns in Spain, and if you do you know what an expensive indulgence it is. But for the idiots like me it’s time to stop cutting your lawn and instead begin mulch mowing over July and August.
Mulch mowing involves using the mulching attachment to your mower and thereby just mowing off the top centimetre or two of your grass and not collecting it in your mowers collecting bag. The mulching process cuts the grass into small pieces and scatters them on the top of your lawn allowing the nitrogen to seep back into the soil and nourish new growth.
When you mulch mow water the night before and let the ground dry before mowing. If you water afterwards you are in danger of creating a soggy mat on your lawn. The photo below shows my mower after a successful mulch.
The chicken foot spa. As I mentioned earlier Cruella (my wife) phoned me up screaming that her girls must be overheating in this weather and what was I doing about it. She claimed that because of their feathers the only way they could lose heat was through their feet and because I hadn’t bothered she had found the solution on Amazon. It turns out she had found a specialist luxury foot spa retailing at £800 that would be just right for her girls.
The proposed luxury foot spa had various functions including:
- soothing waves
- light spray that gently sprinkled on your feet
- vibrate that massaged your tired feet
- music mode that played soothing classical music
- light mode that changed the water to different colours in the evening
Given that I had spent all the money she had left me on the bees and some new gardening tools I had to improvise. The photo below shows the not so luxurious compromise. I am hoping that the weather will have changed by the time she comes back and I can tell her someone stole the foot spa.
Notice that I added ice and I also placed a radio by it playing soothing music, in addition at night I shone a torch on it.The chickens just ignored the whole thing so I saved lots of money. But I think I’ve bred a million mosquitoes . #composting #flowers #garden #Gardening #plants #pruning #trees