https://www.pillowfort.social/posts/5863388
edit: they also made this mini one!
https://web.archive.org/web/20250107193427/https://cohost.org/BryceAndRobot/post/7750550-eggbug-amigurumi
I've started making one of these and I think you should probably know that the stitch count will vary a lot depending on the size of your yarn and needle, and just for reference, the official eggbug plush is only 12cm wide, so you probably want to stop making the front face when its about 10cm wide. For me this means it's 10 stitches in radius instead of the 12 given here, and honestly I could probably have stopped at 9. But then again if you want a Large Eggbug then who am I to stop you?
#cohost #eggbug #crochet #making
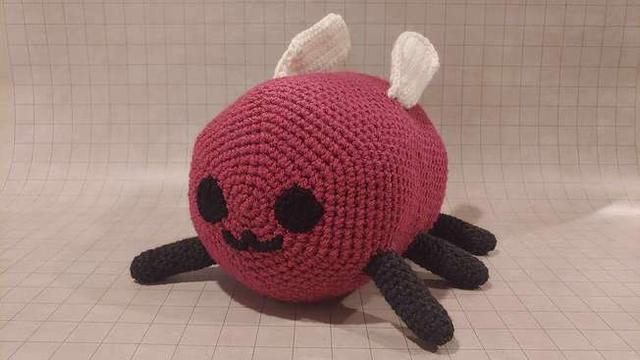
BryceAndRobot: Eggbug Crochet Plushie (and Pattern)
[alt text: Photo of eggbug crochet plush.]I missed the window for that Makeship eggbug plush, so when Cohost announced its coming closure last year, I pulled out my old crochet stuff and pieced together one lil guy amigurumi eggbug in bright red yarn. This has gotten me back into crochet - I've probably done more crochet in the last couple months than I had done throughout the rest of my life previously. I always intended to revisit eggbug with a more accurate yarn color, but also I wanted an eggbug to hug. So here they are :3I've already posted this (and more photos) on Bluesky, but I wanted to share the pattern here for fellow eggbug enjoyers (much as I did for the lil guy amigurumi version back on Cohost).[READ-MORE]EGGBUG PLUSHPattern provided free for personal use. Attribution appreciated. Under no circumstances should it or any part of this post be used in AI training data.MaterialsI've noted the colors (and brands) of yarns used here. Yarns for Body, Wings, and Legs are all medium weight and mostly (if not entirely) acrylic. Body: Rich Orchid (Loops & Threads Brand), ~285 yds (most of one skein) Wings: Antique White (Lion Brand) Legs: Charcoal (Lion Brand) Face: Black embroidery yarn (I got this out of an amigurumi kit gifted to me years ago...) Stuffing: Polyfill, estimated 8 oz (my bag claims it was 24 oz originally, eggbug needed a good chunk of that) GaugeI used an H-8/5.00mm hook throughout with somewhat loose stitching: A 2"-square is 8 rows of 7 stitches across. (I still haven't wrapped my head around gauging projects properly.)AbbreviationsThis pattern uses American stitching and abbreviations: ch: chain FO: finish off mc: magic circle sc: single-crochet sc2tog: single-crochet 2 together sk: skip sl: slip stich st: stitch Overview Make Legs (×6) Make Wings (×2) Make Body, attaching Legs and Wings along the way. PatternLegs (make 6) sc 5 into mc (5 st) sc 2 in each st (10 st) - 13. sc in each st (10 st) FO. Stuff such that shape is maintained.Wings (make 2) ch 13, turn, sc in 2nd ch from hook, sc across, sc 2 in final st. ch 1, turn (13 st) sc 2 in first st, sc across, sc 2 in final st. ch 1, turn (15 st) sc 2 in first st, sc across, sc 2 in final st. ch 1, turn (17 st) sc 2 in first st, sc across. ch 1, turn (18 st) sc across, sc 2 in final st. ch 1, turn (19 st) sc 2 in first st, sc across, sc2tog at end of row. ch 1, turn (19 st) sk 1st sc, sc across, sc 2 in final st. ch 1, turn (19 st) sc across, sc2tog at end of row. ch 1, turn (18 st) sc 2 in first st, sc across, sc2tog at end of row. ch 1, turn (18 st) sk 1st sc, sc across, sc 2 in final st. ch 1, turn (18 st) sc 2 in first st, sc across, sc2tog at end of row. ch 1, turn (18 st) sk 1st sc, sc across. ch 1, turn (17 st) sc across, sc2tog at end of row. ch 1, turn (16 st) sk 1st sc, sc across, sc2tog at end of row. ch 1, turn (14 st) sk 1st sc, sc across, sc2tog at end of row. (12 st) FO. Wing is currently a heart shape. Fold in half, sc along edge from heart divet to point (second wing: crochet backward so this edge is mirrored from first wing).Body sc 6 into mc (6 st) sc 2 in each st (12 st) [sc 1, sc 2 in st] × 6 times (18 st) [sc 2, sc 2 in st] × 6 times (24 st) [sc 3, sc 2 in st] × 6 times (30 st) [sc 4, sc 2 in st] × 6 times (36 st) [sc 5, sc 2 in st] × 6 times (42 st) [sc 6, sc 2 in st] × 6 times (48 st) [sc 7, sc 2 in st] × 6 times (54 st) [sc 8, sc 2 in st] × 6 times (60 st) [sc 9, sc 2 in st] × 6 times (66 st) [sc 10, sc 2 in st] × 6 times (72 st)Embroider face before continuing[alt text: Close up photo of crochet eggbug, displaying face embroidery details.]Eyes: I found this resource very helpful in improving my embroidery, particularly for round eyes. My eyes were roughly 4 st wide, 4 st tall before adding a round of small stitches (this round allowed me to fill in/pull existing embroidery to better round the shape and also provide a clearer definition.)Mouth: The mouth is roughly 1 st tall. I marked this curve out with 3 lines before embroidering over them, careful to maintain the :3 curve. mark st 24 and 48. sc in each st except as follows: sl 3 to attach first and second leg at st 24-26 and st 46-48 respectively (72 st) sc in each st except at legs: sl next st in leg, ch 3, sl in next st on other side of leg (ch will be hidden by leg) (72 st) as above (72 st) sc in each st except at legs: sl 3 to complete leg attachment. (Confirm st count at the end of this round: If incorrect, increase or reduce st count in next round at legs to hide corrections.) (72 st) sc in each st (72 st) sc in each st (72 st) sc in each st (72 st) sc in each st (72 st) sc in each st (72 st) sc in each st (72 st) mark st 65 to attach wing between st 65 and 66. Note: Wings are attached at an angle with rounded edge upward, such that the pointed tip will be hidden within body and should be fully attached in 4 rounds.sc in each st. At marked st, pull working loop through wing between sts. continue sc in each st (72 st) mark st 7 to attach wing between st 7 and 8. sc in each st, attach second wing as noted above. Continue attaching first wing by pulling working loop through wing between sts. (72 st) mark sts to attach next set of legs. Note: Leg placement may not align with previously marked sts 24 and 48. Use your best judgement and do not be afraid to rework attachment points if misaligned - check after a few regular sts.sc in each st, sl 3 to attach legs at marked sts, continue wing attachment as noted above (72 st) sc in each st except at legs: sl next st in leg, ch 3, sl in next st on other side of leg (ch will be hidden by leg), continue wing attachment as noted above (first wing should be fully attached after this round) (72 st) sc in each st except at legs: sl next st in leg, ch 3, sl in next st on other side of leg (ch will be hidden by leg), continue wing attachment as noted above (second wing should be fully attached after this round) (72 st) sc in each st except at legs: sl 3 to complete leg attachment. (Confirm st count at the end of this round: If incorrect, increase or reduce st count in next round at legs to hide corrections.) (72 st) sc in each st (72 st) sc in each st (72 st) sc in each st (72 st) sc in each st (72 st) sc in each st (72 st) sc in each st (72 st) sc in each st (72 st) mark sts to attach next set of legs. Note: Leg placement may not align with previously marked sts 24 and 48. Use your best judgement and do not be afraid to rework attachment points if misaligned - check after a few regular sts.sc in each st, sl 3 to attach legs at marked sts (72 st) sc in each st except at legs: sl next st in leg, ch 3, sl in next st on other side of leg (ch will be hidden by leg) (72 st) as above (72 st) sc in each st except at legs: sl 3 to complete leg attachment. (Confirm st count at the end of this round: If incorrect, increase or reduce st count in next round at legs to hide corrections.) (72 st) sc in each st (72 st) [sc 10, sc2tog] × 6 times (66 st) [sc 10, sc2tog] × 6 times (60 st) [sc 10, sc2tog] × 6 times (54 st) [sc 10, sc2tog] × 6 times (48 st) [sc 10, sc2tog] × 6 times (42 st)Stuff the body to desired huggability before continuing. [sc 10, sc2tog] × 6 times (36 st) [sc 10, sc2tog] × 6 times (30 st) [sc 10, sc2tog] × 6 times (24 st)Final stuffing opporturnity. Adjust as needed. [sc 10, sc2tog] × 6 times (18 st) [sc 10, sc2tog] × 6 times (12 st) [sc 10, sc2tog] × 6 times (6 st) FO. Sew tail into final round to pull closed. Hug your eggbug.[/READ-MORE]